Junior Year Projects
1st semester
Through courses such as ME303 (Fluid Mechanics), BI315 (Systems Physiology), and ME358 (Manufacturing Processes), I have had the opportunity to gain insights into new engineering concepts. Additionally, courses like ME305 (Mechanics of Materials) have further deepened my understanding of topics I had previously learned the basics about.
2nd semester
The second semester of junior year was interesting in that most of my classes had related aspects in concepts. Filtering, Fourier transforms, Bode plots, and other signal conditioning aspects were discussed in all ME310, BE493, and BE403 courses. The equations of motion derived in ME302 (1st or 2nd order) were often used in courses such as BE403 and ME310 to analyze their natural frequencies, exponential decay envelopes, etc., as well as in ME360 to analyze the maximum acceleration of the car with the steel bar. It was very intriguing to see the overlap between my classes and to see how one concept relates to another. Also, being able to further investigate similar but specific aspects in each of my classes helped my overall understanding of it all. Overall, this particular semester successfully implemented a new practical way of thinking within me.
Additionally, this semester consisted of many group projects, and I learned to work with a diverse group of people with various skills, backgrounds, and schedules. All the groups were very different—sometimes I had to take initiative and lead the project, while for others, we all contributed equally, and sometimes I had to step back and let other people lead me. Either way, I learned that the most important thing for a group project is to be flexible and adjust based on the team's needs. It was when team-first mindsets were enforced that the byproduct, as well as everyone’s experience, turned out positive. I’m most proud to have gained such skills—to be a leader in enforcing the positive and selfless team collaborative environment—this semester.
Overall, this semester was successful in that it not only challenged me by implementing a different and deeper way of thinking but also as a person and in the insight I’ve gained through group projects.
ME303: Fluid Mechanics
In ME303, I mastered the fundamental concepts of fluids, spanning from fluid statics to dynamics. Specifically, I covered topics including Buoyancy force, Bernoulli principles, Forces and Momentum of fluids, Reynolds numbers, and various types of flow such as turbulent, laminar, and flow around specific shapes. I found gratification in applying these concepts during laboratory sessions and connecting them to real-world scenarios, such as understanding the aerodynamic design of cars.
Similar to my proficiency in thermodynamics, fluid dynamics concepts came more naturally to me than some other aspects of mechanical engineering, like force balance statics. Overall, the course was intriguing, and I am enthusiastic about the prospect of taking more advanced fluids classes in the future.

ME305-Mechanics of Materials
This course served as an extension or branching from the statistics course I took during my sophomore year in the fall. Since I enjoyed taking material science, I really enjoyed this course and how statics (force analysis) concepts can be applied to understand the displacement, torsion, bearing, etc. of the different material objects. Although these concepts were challenging to understand and learn at times, it was rewarding being able to analyze how objects can change shape under tension/compression in the real world.
BI315- Systems Physiology
System Physiology was one of my favorite classes this semester. Throughout the course, I delved into the fundamentals of the nervous, cardiovascular, urinary, endocrine, and digestive systems, among others. This exploration increased my awareness of how my body responds in various situations and the underlying reasons for its reactions. For instance, understanding the physiological mechanisms behind the need to use the restroom, post-carb meal fatigue, or heavy breathing during exercise became clearer.
One highlight of the class was the incorporation of case studies, providing an opportunity to apply learned concepts to real-world situations. In the nervous system unit, for example, we analyzed a case study involving a patient exhibiting symptoms of immobility in the left leg without pain in the right leg, requiring us to diagnose the underlying issue.
Additionally, the labs played a significant role in the course, allowing us to engage with primary sources, conduct experiments, and draw conclusions. Working with tools like the electrocardiogram was particularly enjoyable, providing insight into constructing a robust scientific argument. Attached below are my lab reports for this class.
ME358- Manufacturing Processes
In ME358, I gained insights into the processes and machinery employed in manufacturing. As I had not been previously exposed to the manufacturing facet of mechanical engineering, delving into these processes proved overwhelming yet captivating. Exploring activities such as welding, injection molding, sand-casting, laser-cutting, milling, and more, I had the opportunity to hands-on experience some of these processes in the lab, which I found particularly intriguing.
Throughout the course, we undertook a mini project applying the manufacturing processes learned in class. While I enjoyed the learning experience, I also realized that this specific concentration was not aligned with my future pursuits.
ME360- Electromechanical Design
Projects:
1) Phone Holder: First task assigned was to create a phone holder (dimensions under 2x2x2 (in)). Often, I become frustrated needing to go back and forth between the recipes on my phone, and cooking. My hands have become painfully crusty due to the amount of times I've washed my hands, going back and forth between touching my dirty phone and fresh produce. I aimed to resolve these problems by designing and creating a CAD model of the phone holder (picture shown on the right). 3D printer was used to manufacture the product.
2) Gasket: Our task was to measure the object by hand using a caliper and create a CAD model and machine a gasket that would fit perfectly on top of the given object. The purpose of this assignment was to understand how to use a caliper, as well as learning to be as precise and accurate with it as possible in order to create a perfectly matched part similar to in real-world situations. To create the gasket, I first measured the dimensions by hand and drafted out a rough sketch. I then made a CAD part using those rough sketch, which I uploaded to GibbsCam to outline the holes necessary for the gasket. Using this outline created, I then machined the holes using a CNC mill and ended with a gasket shown on the right. Overall, I believe that this project was successful as my gasket fit perfectly on top of the given object, and I was able to use and understand how GibbsCam works.
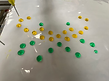
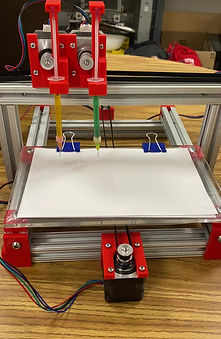
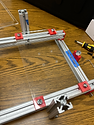
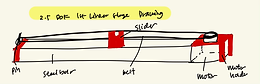
3) Cartesian motion system (2.5 DOF):
Our task was to design a motion system with 2.5 DOF. Our group aimed to design an auto pipette machine that could dispense droplets by itself. To make the project more interesting, we decided to make the pipette machine draw art with images we have inserted using pipette droplets. This project was perfect for me, especially as a biomedical and mechanical engineering double major, since the pipette is something often used in my biomedical engineering labs. Creating an auto-pipette machine using my mechanical engineering background for potential biomedical applications was very intriguing.
We achieved this by having 4 motors – One motor to move our acrylic plate canvas into the x-direction (side-to-side), another motor to move the syringe holder side to side. The last two motors were attached to each syringe to push the top down to eject liquid.
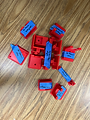
Many steps were taken in order to make our functioning final product. We first drew our potential ideas to have a functional machine that did what we aimed to do. We then assembled the materials needed such as motors, steel bars, screws, etc. One of the first things we did was to 3D print the parts we needed such as the motor holder, belt holder, pipette syringe holder, slider against the syringe, etc. At the same time, we worked on a MATLAB code that could take in an image with dots on and generate a corresponding g-code. We also worked on machining, in particular, cutting the steel bar to the size that we wanted and creating a hole in the steel bars to fit the screws and produce a stable structure.
There were two main challenges our group faced. The first challenge was estimating how much the CAD shrinks when it's printed. We made tolerances in our CAD model to account for the shrinking of the parts; however, sometimes our CAD model, especially for the belt holder in which the belt needed to go through the hole perfectly, turned out to have either too small of a hole or a large hole that was too loose to tightly hold the belt. Another challenge we had was finding a mechanism to keep the syringe in place when pushing down on the top with the motor to eject liquid. We were ultimately able to 3D print a part that worked similarly to a spring and kept the pressure on the side of the syringe in order to keep it in place while ejecting liquid.
I learned a lot through this project, such as how stepper motors work, how we can create things from scratch and turn an idea into a product, and teamwork.
Overall, this project was successful as our project was able to go above and beyond the requirement of 2.5 DOF and we were able to achieve our final goal of creating pipette art with two colors. At first, our group was concerned with the accuracy of the pipette drops; however, our machine gave us pretty accurate results most times, which we were very happy with.
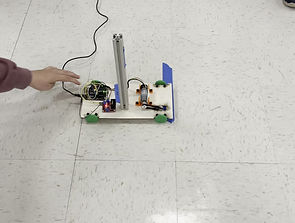
4) Motor speed control:
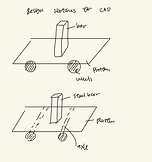
The purpose of this project was to build a car with a DC motor that can move a 12-inch steel bar for 10 feet (forward and backwards) without it falling. Our main tasks were split into 2 steps. The first step was CAD modeling and using the motion analysis tool to determine the maximum acceleration that the car could achieve without the steel bar falling. The second step was to actually build the car we had simulated and test it with the calculated acceleration.
CAD MODEL:
The purpose of having the CAD model and its motion analysis is to get a better grasp of what the maximum theoretical acceleration and time should be around once we build the real car. For the CAD motion analysis, I initially encountered a lot of trouble since the mates for the steel bar and the car had to be particular in order to achieve the necessary motion analysis for this project. With the professor's help and understanding the degree of freedom it can limit with specific mates made, I was able to obtain the motion analysis result. The sketch of the design and the ZIP file of multi-body simulation in Solidworks is attached to the right. The record time was 9.25 seconds, and the theoretical maximum acceleration achieved with my model was 816 mm/s^2. This maximum acceleration that my car can achieve was found by solving for the time at which the front reaction force of the steel bar is equal to 0. The trapezoidal shape velocity profile was then created with the slope of maximum acceleration obtained. In real situations, the record time would be longer and the maximum acceleration would be lower. This is because in the real world, there are other factors other than gravity that makes the steel bar easier to fall such as vibrational factors. We then used these results to adjust the motor speed in the Arduino (by adjusting the delay factor).
BUILDING:
For the actual build, we 3D printed the wheels, the axle holder, and the motor holder. We also took a wooden board to be our platform on which we drilled holes in order to mount the holders and Arduino boards in place. Overall, this project was successful as I was able to learn the difference between the DC and the stepper motors we had used earlier in our Cartesian motion project. We were also able to achieve the distance of 10 ft (5 ft forward and 5ft back) with approximately 8.5 seconds. Our group was also able to work on this project more efficiently since we knew the strengths of each person and were able to collaborate effectively.


ME310- Instrumentation
ME310 equipped me with practical skills for experimental design and measurement. Using different sensors (such as thermometers, strain gauges, and potentiometers), signal conditioning methods (such as low-pass filters, Wheatstone bridges, and voltage dividers), and various ADC methods (oscilloscopes, DAQ, and multimeters), I gained expertise in designing experiments and analyzing data. I learned to interpret datasheets, calculate uncertainties, and utilize MATLAB for signal analysis. The course included 4 individual lab reports and a final group project focusing on sensor properties and system analysis. Overall, it provided valuable insight into real-world measurement techniques.


BE493- Biomedical Measurements
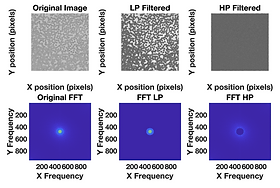
BE493 was a laboratory-based class focused on using various biomedical engineering devices for measurements. It was intriguing to take ME310 and BE493 simultaneously, both measurement courses for MechE and BME, and observe their differences and similarities. Compared to ME310 labs, BE493 labs were MATLAB-heavy, providing more insights into computational tools for data analysis. There were five BE493 labs and a group project. The first lab involved ECG measurements at rest, during box breathing, and exercise. The second lab focused on spectroscopy, measuring absorption, scattering, and fluorescence. The third lab utilized a microscope, experimenting with resolutions and imaging methods such as dark-field, and applying red, green, and blue channels to count RBC and WBC in an image. The fourth lab consisted of EOG measurements and applying 1D and 2D Fourier Transforms. Lab 5 utilized a function generator and an oscilloscope to experiment with filters and analyze parameters such as gain. For our group project, we worked with microplate readers, writing about theory, practice, and designing an experiment to demonstrate the device's practical use. All corresponding work is shown on the right.

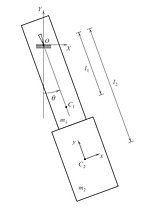
ME302- Engineering Mechanics II
In ME302, I learned about acceleration and velocity theories for complex systems, deriving equations of motion for particles and composites. Towards the end, we delved into damped motion variations (undamped, underdamped, overdamped, critically damped), a topic also covered in other courses. The sole lab in this class involved a pendulum, where we varied the initial release angle to analyze acceleration. Theoretical accelerations calculated from class-derived equations were compared with experimental results. The lab report is attached on the right.